
PROBLEM SOLVING LO3 3.1/3.2
LIGHTING
COLOUR GRADING
MINIATURES
SOUND
VISUALS
INTRODUCTION
This is the problem solving stage of my Unit 13 project. This stage of this project is done in order to predict the problems that I am going to face when creating the product, and is about finding ways around the problems. Since I intend to make this project a cyberpunk short film, I will encounter lots of issues throughout both the production and post production stage, so this part of the project is vital to make the creation of my short film as smooth as possible. During this stage I am going to look into two different areas of problems that I am going to face, for example, practical problems and theoretical problems. In the practical problems section I am going to be looking into, lighting tests, colour grading black magic log footage, and miniature test shoots. For the theoretical problem solving I am going to look into, cinematography, mise-en scene, sound, and audience.
PRACTICAL PROBLEM SOLVING 3.1
LIGHTING TEST SHOOT
One of they key parts to creating a dystopian world in a film is the use of lighting, specifically abstract colours. For example, in Blade Runner 2049 the final location is set in a desert wasteland, so the lighting is set to be a harsh orange.


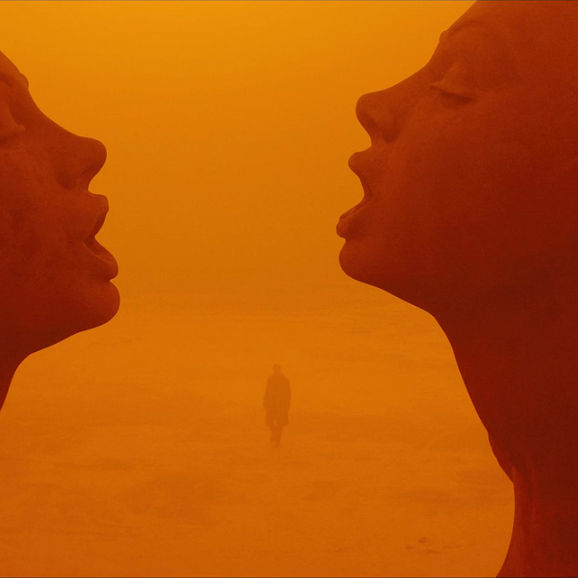
So when it comes to setting locations in my story I want to use lighting to distinguish the different areas. For example, in one of my scenes it is set in. forest, however in order to create separation from the other locations I am going to use purple lighting to create a dystopian forest. As well as this, I wanted to recreate the desert from Blade Runner 2049, so in order to do this I chose to light a scene using orange lighting, in front of a green screen.
When doing the lighting for this test shoot I learnt many things that will help me to overcome problems. For example, when it comes to lighting the green screen and lighting the subject, in order to create separation, I needed to light the green screen with white lights, and the subject with orange lights. By doing this it allowed me to ultra key the green screen, and add the subject onto a desert scene.
When filming this lighting demo, it was not only a way for me to experiment lighting a cyberpunk scene and a scene using green screen, but it was to also allow me to get used the camera that I am going to use for the filming process of the project. This camera is a Black Magic Pocket Cine 4k, this camera is a big step up from any previous kit that I have used in the past, since this camera is the first cinema camera I have shot on. This meant that there were learning curves when it came to figuring out how to operate the camera, i.g ISO and aperture, and provided me with another problem to solve. However after exploring some of the settings, it became quite clear how the camera worked. One thing that I did struggle with when filming was coping with the weight of the camera, this meant that the shots that I took ended up having a noticeable shake, so in the future I want to look into the use of a gimbal to steady my shots.


I believe that by doing this lighting test shoot it helped to identify hidden problems that I was unaware of when planning the problem solving stage, like the operation of the camera that I am going to be using. So by doing this test shoot it has helped me to best prepare for the production stage of my project. In this camera there were certain effects that I am still unsure of. For example, false colour which is an effect that is used to help adjust the exposure of the shot. This effect is something that I have not used before when exposing shots and I believe it will be very beneficial for me to use when shooting, so I would like to return to my research stage to look into the use of false colour. Going forward with the problem solving stage of this project I would like to look into colour grading log footage, and specifically colour grading the shots that I have filmed in the lighting demo.
LIGHTING INITIAL CONCLUSIONS
COLOUR GRADING
Since this project requires me to shoot on a camera that shoots in a log format, every piece of footage will need colour colour grading. This is one of the main problems due to the visuals of my project relying on the colours, so I wanted to look into colour grading the log footage that I shot on the Black Magic camera. In my previous project, Unit 12, I looked into the importance of colour within film, for this I did primary research into colour grading log footage, so my knowledge from that project is going to be useful when it comes to colour grading in Unit 13.
So when it came to colour grading the footage that I had shot, it was fairly easy. However, one of the issues with colour grading is that it is time consuming, so I want to discover a way of quickly colour grading as I will have a high quantity of shots that will need colour grading.
When it came to colour grading the shot from the shoot, I used a LUT in order to bring the footage to rec.709, this saved me lots of time as I didn't have to manually create rec.709. This meant that I could spend more time focusing on the specific colours, shadows and highlights that I wanted for my shot.
When shooting the shot, I had the intention of including the subject in an orange desert scene, so I lit the subject according to where I wanted the scene to be set. This helped not only with the green screening, but it also helped to colour grade to the orange tones in the post production stage.
COLOUR GRADING INITIAL CONCLUSIONS
From doing this colour grading it has helped me to predict, and solve one of the main problems that I am going to face when it comes to the post production stage of the project. For example, the main problem was the fact that I had little experience colour grading high quantities of log footage, so I needed to find a way around the time consuming task. So by doing this experiment I have been able to significantly reduce the time that I need to colour grade my footage, saving me time in the post production stage. As well as this, it gave me more experience colour grading for the specific shooting profile of the Black Magic camera. Since in my Unit 12 project, I only colour graded stock footage from the RED camera, and emulated log footage from my Sony A6000, I did not have much experience with editing this log format, so I now have gained a much better understanding of the grading techniques.
MINIATURE BUILDING TEST
One of the best ways to create a world within the cyberpunk genre is through the creation of miniatures. So in my Unit 13 project in order to best immerse the audience I wanted to create a city skyline for my world. In order to do this I researched into the techniques that are needed to build miniatures. However I was not able to create a miniature, so my understanding is still weak. This has created a problem because the miniatures are a big part of my project. So in order to overcome this I wanted to experiment with building a miniature.


When creating these buildings, I learnt a lot about the techniques of building miniatures. The one building I put the most effort into was my cyberpunk japanese temple. For this building I really wanted to add a lot of detail since I was going to divide my buildings into foreground and background buildings, and this building was a foreground building. The decision for me to divide the buildings into foreground and background, really assisted the building process, as if a building was in the foreground I would include a lot of detail, however if a building was a background, I would keep the building to more of a sillouette.
PRACTICAL PROBLEMS INITIAL CONCLUSIONS
When going into this area of my project, I really wanted to look into the areas that opposed a problem in my research stage. For example I wanted to look into lighting, colour grading, and building miniatures. When looking into lighting, I didn't want to just explore through research, so I decided to test out the lighting by using green screen, and trying to replicate the orange lighting from the desert in Blade Runner 2049. In doing this, I feel like my understanding of abstract lighting, has drastically increased. As well as this, I wanted to re touch on my experiments with colour grading, since I would be using a camera that shot in log format. Since I already looked into colour grading during my specialised study, I did not need to experiment too much when it came to grading multiple shots. However, I specifically needed to work on grading the footage from the BlackMagic, since I had never used the camera before. So by doing this grade, it not only helped me to experiment with unnatural colour grades, e.g bright orange, but it allowed me to get an understanding on how to grade footage from the camera I was going to be using. Finally, when looking into practical problem solving, there was one vital area that I had to look into, in order to have a succesful production. This area was the creation of miniatures, for example a cyberpunk city. In order to look into this, I wanted to create a series of buildings out of cardboard boxes and scrap plastic, in order to create the look of a cyberpunk city. One of the biggest challenges I faced when making these buildings, was trying to create interesting shapes, and still provide a level of scale on the buildings. One thing that I took into consideration when looking at scale on the buildings, were the use of holographic advertisments on the side of the buildings. For example, on some of the buildings I left white foam board in order to add advertisments on them in post production. I believe that creating these buildings has helped to give me an understanding of how I would like to film the miniatures, and how I want to compose my city, therefore eliminating one of the biggest challenges of the production, which was trying to show the audience that it is set in a different world.
THEORETICAL PROBLEM SOLVING
When looking into the theoretical problem solving for this stage of the project, I wanted to look into two areas that I knew would be an issue when creating the project. These areas being the audio and visuals on the production. When planning for a project it is very easy to become ambitious and seperate from achievable and what you want. So I want to solve the problem of what camera setting I will be shooting on as this is a grey area for me on the camera that I am shooting with. When looking at the audio side of the production, I wanted to look into how I will record foley, and any contingency plans if I run out of time for audio.
VISUALS
In order to solve the problem of me not understanding the camera, the best thing for me to do was test out all of the settings on the camera. So when doing the lighting test shoot for the practical problem solving, I made sure to spend time looking into the camera settings, looking at ISO, White Balance, Shutter speed, and the other basic settings. Before doing the test shoot, I didn't want to go in without any knowledge, so I did some research into the camera settings by watching a video. This helped me out as it meant that I was not going into the test shoot with no ideas on how to operate the camera. From doing this test shoot, I believe my overall knowledge of the camera settings have improved. One specific area that I was unaware of until completing this problem solving, was the different controls for changing the shutter. When looking at smaller mirrorless cameras, the shutter speed is framed as 1/50, but on the black magic the camera settings are down as shutter angle. This was very confusing for me going into the test shoot, however I discovered that in the camera settings you can change the setting from shutter angle, back to shutter speed. This made it a lot easier for me to operate the settings of the camera. This problem solving was extremely beneficial for me to do, since it means that going forward into the production stage of my project, I don't have to waste filming time by trying to work out how the camera will work.
AUDIO
When looking into the problems that I might encounter in this project, audio really stood out to me. I knew it was going to be one of the most important areas to get correct if I wanted to boost my production value. The main problem that stood out to me about the audio of this project was going to be the foley for the film. Since this project is going to be done on a tight schedule, I wanted to make sure that I solved the problem of being able to record foley even before I begin filming. When thinking about how I will record audio, I knew the best option is to record foley, with a mic an audio script, and record the sound effects that are on the screen. However, since I am on a tight schedule, I needed to think of other options. The options I discovered when looking into this problem were to either turn the audio level up when filming so the audio of the actors actions gets picked up. This was the safest option for recording foley on a short time schedule. However, in dialogue scenes, turning the audio track up can severly butcher the dialogue of the scene. So my other contingency to this problem was to look at using sound effects. For this I researched into potential sound effects libraries. At first I thought youtube was the best option, however it does not always give the best sound effects. So I discovered that the royalty free music service, artlist.io, had a sound effects library with thousands of different sound effects. This meant that in the case that I did not have time to record foley, or the audio levels when filming didn't pick up the in scene sound effects, I had a fail safe and didn't have to ruin the production value of my short film due to a lack of good sound design.
THEORETICAL PROBLEM SOLVING INITIAL CONCLUSIONS
For the theoretical problem solving area of this stage, I only had to areas that stood out to me to problem solve. However, these two areas were evidently very vital for me to solve in order to have a smooth production and post production stage. For example by looking into the problem of not knowing about the camera settings on a new camera, it will save me from loosing hours of time on the shooting days trying to discover the settings. So by solving this problem it has allowed me to feel a lot more confident that I will be able to confidently go into the production stage.
When looking into the audio side of theoretical problem solving, I knew that the problem I needed to solve would be a problem that would mostly effect the post production stage of the project. Looking at the other areas of problem solving that I already solved, none of these problems effected the audio side of the project, so it was important that I looked into this area, and specifically how I will go about creating the audio design for my project. So from looking into this problem I think that it has given me not just one contingency to solve the problem, but two. Those being to record audio on the day, and to use sound effects. So going forward with the production stage of my project, I think that it is smart for me to record audio on the set, as a fail safe, and if I have time, then look at foley.
PROBLEM SOLVING EVALUATION
After completing the problem solving stage of Unit 13, I am a lot more confident about heading forward with the production of this film. One area that really stood out to me about this problem solving stage, was rearching into the theoretical problem of audio. I think this was one of the biggest problems in terms of creating a high quality piece of work, so solving this problem will definetly be crucial to the final outcome of the project. Going forward into the pre production stage of this project, I think creating an audio script will be a great help, in order to best prepare myself for the tight schedule, however if I am unable to record foley, solving this problem has given me contingencies.
One area of the practical problem solving that I was very unsure about when looking at the project, was the creation of the miniatures. Since this was something that I had never done before, I was very uneasy about making these, and was a major problem for me to solve in the practical problem solving area. So by solving this problem, and experimenting with the building of the miniatures, I feel a lot more confident to produce a whole city, and create the world for my audience. Going forward with the pre proudction stage of my project, I need to continue to produce buildings for the city, expanding the range of the buildings, and making it realistic when it comes to filming in the production stage.
I believe that the production stage of this project has been a crucial part to ensuring that the project runs as smooth as possible. So I can now go forward with this project, feeling confident that any problems I encounter, I will be able to solve.